Car detailing is the art of getting your cherished motor looking as near to, and in many cases better than the day it was driven out of the showroom.
Whether you are seeking absolute perfection, to go one better than the next door neighbour or simply to look after and protect the value of your pride and joy, there are a number of key steps required to get and keep your vehicle looking like new.
This article forms part of the introduction to car detailing from our Detailing Guide series. Here I kick-start you with my 10 essential do’s and don’ts of successful car detailing.
If you follow and keep to these suggestions it will make your detailing much much easier and more enjoyable as well as avoid some of the pitfalls and mistakes that I made as I was learning the ropes.
Car Detailing Do’s & Don’ts
 1. Ditch That Sponge – if you have signed up for and are following my Detailing Guide series you will know that this is my first recommendation to you. If you haven’t already, your first step will be to ditch the sponge and replace it with a quality wash mitt.
2. Household Detergents – you may have heard this before, and even if you have, I will repeat, as it is so important. Never use household washing up liquid or detergents to wash your car. They are designed to remove even the hardest of grease and grime and when used on your car will strip the paintwork of the protective wax and oils quicker than nitromors strips paint. Dulling the paint and trim with every wash.
Instead, use a specially formulated car wash shampoo that will remove the dirt and grime without removing your paints protection.
3. Dirty Water – never throw water you have used to wash your car back over your bodywork. If using buckets, use the two bucket method. One containing the shampoo and water mix and the other clean water. Using this second one to rinse your mitt in between applications of the shampoo/water mix from the first bucket. And if you have to rinse off with a bucket or two of water, make sure you use fresh, clean water.
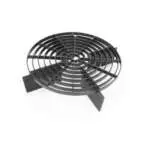
 4. For Even More Protection – consider a Grit Guard. A simple yet clever device that sits under the water at the bottom of your bucket and will allow the grit to fall between holes but not allow your mitts to reach the bottom. Preventing it from picking or stirring up the grit back into your mitt or the water above the guard.
5. Spray It – and if you have access to a hose connection, one other alternative to the bucket would be such as the SuperSpray. This ingenious yet simple car detailing tool fits on the end of your hose and will automatically mix the shampoo with the clean water to the required dilution and spray over your car.
And with the simple rotation of a small tap, you can, as often as you like, switch back to plain water to rinse the dirt off your mitt and the shampoo from your car. Simple to use and extremely effective it helps to further protect your paintwork from fine swirls and scratches.
6. Wash Tyres and Wheels First – do not use the same water for washing the paintwork after. Throw it away and rinse the bucket out before filling again for the paintwork.
7. Use a Separate Mitt – for your wheels and tyres use a separate mitt than the one you will use for the paintwork. You don’t want to cross-contaminate – brake dust can be very unforgiving on your paintwork.
8. Be Cool – wash your vehicle when it is cool and where possible wash in the shade to prevent water evaporating too quickly and causing water spots.
9. Wet It & Top Down – first wet the surface of your vehicle with a good spray of water to loosen surface dirt. For bikes avoid the use of a pressure washer or strong hose spray.
Wash from the top of your motor down in straight lines, not a circular motion. For bikes start with the tank and windshield (where relevant). Rinse each section as you go to avoid chances of soapy films remaining on your paintwork.
10. Final Rinse – where possible give your motor a final rinse with a hose – do not use a spray attachment as you want the water to sheet off the paintwork, taking any last particles and residues with it.
 If you follow these small nuggets of car detailing advice you will be well on the way to reducing the cause of swirling on your paintwork.
This is not to be confused with “Paint Cleaning” which is the next essential step in the car detailing process to then help remove any existing swirls, fine scratches or discolouration and which I describe in more detail in the next step of the guide series.


1 Comment
Ali Nawaz
good tips for car detailing
Alliance Motors & Body Repairs Wokingham